Saturday, January 10, 2015

Alternative Approach to Art Smart Lesson/Paul Klee's "Head of a Man": Elementary Grade (suggest 4th grade and up)

For this lesson, you will need:
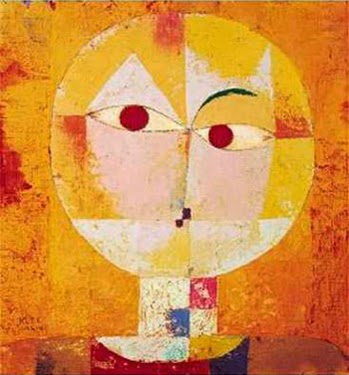
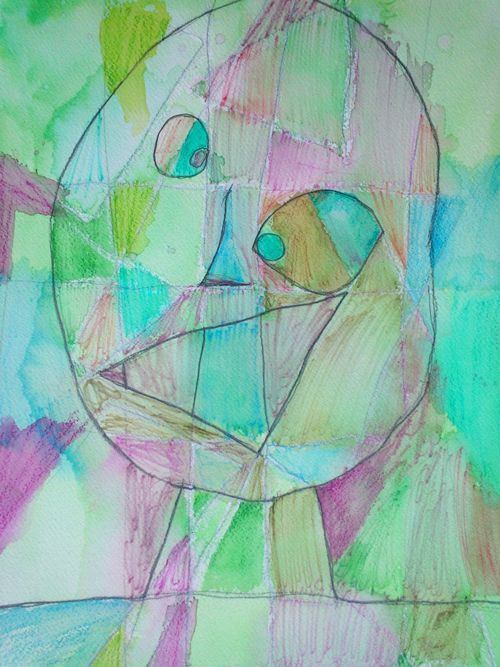
"Head of a Man" by Paul Klee
  • 9x12 Watercolor paper (or thick Bristol board)
  • Pencil
  • Eraser, kneaded or vinyl
  • White oil pastel (1st choice) or white crayon
  • Watercolor paints (preferable pan style for ease of clean up)
  • Brush, 1 inch or so wide, soft watercolor style
  • Brush, watercolor style, about 1/4 round
  • Jar of water. Have class helpers change out the water while the students work. Muddy water makes for muddy colors in the painting.
  • Optional: aquarelle pencils (watercolor in pencil form)

Abstraction tends to be tough for elementary school students.  Here is a method I found that worked well with a class of 4th graders that produced great results and more importantly, little frustration.


First, I suggest hold off handing out the paints and water until the pencil drawing part is done. Then after briefly discussing Paul Klee and his work to the class, have them follow a series of verbal instructions.


Verbal instructions:
1. Paper should be portrait orientation. Have students write their name on the back.
2. Draw 4-5 horizontal lines across (going off the edges) the page. Lines should not be perfectly spaced or parallel. For steps 2-5, have students draw lightly as some of the line will be erased later on.


3. Draw 4-5 vertical lines (off the page and not perfectly spaced or parallel like above). For these instructions, from this point on the past stages will be in blue line.
Adding vertical lines.
4. Draw 4 rectangles. Okay to overlap and go off the page.
Adding rectangles.

5. Draw 3 triangles. Okay to overlap and go off page.
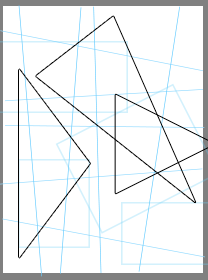
Adding triangles.

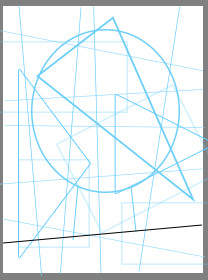
6. Drawing the circle for the head - should occupy about 60-75% of page. From this point on, have students press harder with the pencil as these lines will stay.

Add circle for head.
7. Add two lines for the neck.
Add necklines.
8. Add line for shoulders.
Add shoulder line.

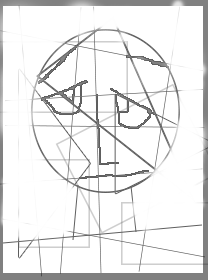
 9. Add eyes/eyebrows, nose, mouth using geometric shapes or lines on the page.
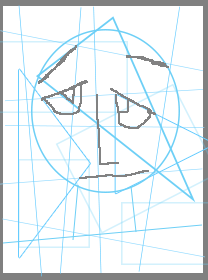
Facial features added.

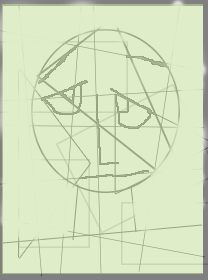
 10. Erase most of the background lines (behind the face, neck, shoulders).

Erase most of background.
11, Using the white oil pastel, go over all the lines in the face, neck, shoulders.  This will act as a resist and help with containing colors within the shapes.

12. Pass out the watercolor paints, water, brushes.  Using water only, have the students go over their entire page with the wider watercolor brush.  While still wet, have them go over the entire area again with one color - not too dark so that other colors can been seen and added. This helps to unite the colors.


13. Add color to the face, neck, shoulders.  Can color in each shape, leave some the color of the wash, connect several areas together with one color, etc. At this point, aquarelle pencils can be used if desired.
Painting done! 
Below is a painting done in class by a 4th grade student.


Monday, October 20, 2014

Trying Out Concepts in Photoshop Prior to Building: Miniature Theater Set/Props for Merrikin Designs/Felt Artistic Creations Photo Background

The past few days I have spent working on a miniature theater (I often create props/sets for local productions and I just love the theater world in general) to be used as a set for my own 3D artwork (needle felted wool figures, fused glass jewelry, etc).

I've been playing with the idea of using blocks to support the fused glass barrettes to raise them up in the picture frame a bit. Originally they were to be black but then I started thinking about the crates I made for a production of Lady Pirates of Captain Bree.  Perhaps they would work as a miniature prop as well?  However I didn't want to spend the time painting a mini version only to find it detracted from the glass art so I decided to test out the idea in Photoshop first.
From Lady Pirates of Captain Bree Set.

I began by isolating each component to test on stage in Photoshop using the lasso tool and then cutting/pasting into the theater file.  Quickly added a color overlay and some shadows to give more of a realistic feel of what I could expect if all items were physically present.

End result: I think it works. Stay tuned - will show the actual painted blocks on the mini stage in my next post to see how they turned out.


Wednesday, June 4, 2014

Needle Felted Wool - Creating Custom Pet Portraits/Sculpture - New Website, www.feltartistic.com

Nimbus (aka Silver Cloud), English Angora Rabbit


My latest work has been creating custom pet portraits in needle felt but before I discuss the felt work, let me introduce the newest member of our household. Meet Nimbus (at left), an English Angora rabbit.  Only pet I've ever owned that I can write off as a business expense.  With each daily brushing, I gather about a cotton ball's worth of angora wool.  The fiber is unbelievably soft and since it is combined with merino wool, goes a long way.  I find that angora works great in my latest endeavor, the dog sculptures.

Toby, Havanese dog
 "Toby" is the second Havanese dog I have done.  I love this particular breed and with the longer fur, it allowed me a chance to incorporate the angora fiber into the piece. I left the angora in its undyed state. The pure white of the wool seems to add a glowing quality.  Can't wait to try dying it although it does felt (during the dye process) easier than Merino...might be tricky to dye. Will attempt the method as in my last post with gradual temperature shifts in the dye bath/rinse.

"Sable", a Mastiff, was done as a memorial sculpture.  About 3" H x 3.5" W, Sable was built on a wire armature. Core wool then added and then as the form neared the desired size, dyed Merino wool was felted. No beads or polymer clay accents used...just fiber felted over wire. I love his pose with extended leg. Think he is my favorite felted animal to date.

Next on my felted projects list...a grumpy cat of sorts. Hope to have him done in a few days and will post the finished piece on this blog.

If you would like to order a custom pet portrait/sculpture, please visit my new site, www.feltartistic.com .  I have full body sculptures (palm sized) or you may have a wearable pin/brooch made of your pet's head or shallow relief full body.


Wednesday, April 23, 2014

Dying Merino Wool using Jacquard Procion MX and Acid Dyes

Abominable Snow Bunny
I have been doing quite of bit of needle felting lately (see my most recent figure, the Abominable Snow Bunny, at right) and have found that I need more color variations than what I can currently find pre-dyed roving.  As I have plenty of Procion MX and Acid dye on hand for use on silk, I decided to try it on wool roving since it is also a natural fiber.

My next felt project is going to be a frog but I found I did not have the greens on hand that I wish to use.  I took small jars and put them in a pot with water.  I mixed small quantities of dye in each year with vinegar and water.  The next step was to wet the wool with room temperature water and then submerge in the jar.  Once the wool/dyes are in place in the pot, I see the stove burner temperature to "3" which is just below a low simmer.  Once the water is hot to the touch, I set the timer for 40 minutes.  After 40 minutes, the burner is turned off and allowed to cool to room temperature.  When cool (usually 4-5 hours), rinse in room temperature water, and allow to dry.

Here are a few things I discovered through experimentation:
  • I found I had more consistent coverage with dye when the roving was wet with plain water rather than tossed into the dye dry.
  • Braiding the roving before submerging in dyes also helps with preventing felting of wool.
  • When removing the roving before it is allowed to cool to room temperature in the pot, it tends to felt (see image below.  Roving to the left of the red line was removed from pot while still hot and rinsed in warm water.  Roving to the right of the line was allowed to cool to room temperature).

Thursday, July 18, 2013

Color Exploration in Digital Media: Using Adobe Illustrator in Creating Color Harmonies (Color Grid)

A few weeks ago, I made a 5x5 square grid comprised of 4 colors in each corner and the resulting blends in the sections between (see post here). This week, I have created the digital version of a color grid using Adobe Illustrator.

Like with the pencil exercise, I again selected four colors to serve as the corners.

I recommend keeping track of the RGB (Red Green Blue) data, it makes it easier to recreate the color at a later time. Using the Gradient menu, change the first point color to one of the four colors and then the last point of the gradient to the color located at the opposite end of the grid.  Create a shape away from the grid area (this will be deleted later) and fill with the gradient. With a color identification tool, determine the RGB values of the midpoint value of the row. With midpoint rectangle in the row selected, fill with shape with the color generated by entering the RGB numbers. Repeat with the 2nd rectangle (before midpoint) and 4th rectangle (after midpoint).  Repeat for all sides (i.e., finding the blends of all four colors before determining the blends toward the center.

Final grid should look something like this:
Here are a few simple compositions using colors generated from the grid above:
More digital color grids to come soon in "Digital Color Harmonies: RGB/CMYK Color Grid Palettes (Nature Vol.1)" (working title) by Christine Musser. Available Fall 2013 in print, Kindle Fire, and pdf versions.
 

Friday, June 21, 2013

Stuck in a Color Rut? Try Using a Color Grid.

Whenever I find myself  repeatedly (and often unknowingly) reusing the same color palette and find I am in need of a change, this exercise often helps me break out of my color rut.  I think of it as an artist's equivalent to an opera singer/musician practicing scales.

This can be done with a variety of media (my next post will feature a digital color grid using Adobe Illustrator) - I have chosen to use Prismacolor pencils for three reasons. 1.  You can choose a specific color that will be consistent over time and record it for future reference (I use the three digit number listed at the end of the pencil), 2. For their color mixing properties/ability to manipulate blends by layering, and 3. Can transport a wide range of colors and not worry about paint spills.

Creating a Color Grid:
Steps 2-3 complete. Beginning #4.
  1. Lightly draw a 5 x 5 square grid with pencil (2b or H will do). 
  2. Choose four colors to use as base colors. Place one color in each corner.
  3. In the middle of each row, mix a color that is between the two end colors (the hue should be the middle point - not leaning toward one end more than the other). If using colored pencils, you may want to lightly dampen a cotton swab with rubbing alcohol or Turpenoid to remove some of the colored pencil buildup in between layering strokes.
  4. Do the same all around the outside blocks of the grid, filling in the blank squares with the color mixture that is the midpoint between the adjacent hues.
  5. Find the center color by gradually building up layers of the four colors and looking at the colors that need to meet in the middle (vertical, horizontal, diagonal).  Depending on the four colors selected, this may often be a chromatic gray.
  6. Lastly, fill in the surrounding inner squares. **It often helps to squint at the colors - if one stands out too much, then the gap in hue shift is too great**

Step 4 complete.

Friday, May 31, 2013

"Flocking" - Great Fundraising Idea Using Plastic Lawn Flamingos: Temporary Yard Art Installation

On May 25, 2013, I woke up to find I had been "flocked." 

For those not familiar with "flocking", it is an excellent way of fundraising with no waste and relies solely on volunteer labor.  In our neighborhood, the flamingos are placed by a local Girl Scout Troop who arrive at a home after dark to arrange a prepaid number of pink birds on the front lawn of an local address designated on a form (see photo at bottom of page) filled out by a previous Flockee.  Included in the group of flamingos, is one large specimen with a plastic bag attached.  In the bag, is a letter (see photo) and form which will enable the recipient to surprise "flock" another person(s) of their choosing. The birds will stay until 7-10 pm that night and then the Girl Scout troop will pick them up and place them at the next destination.

Even though we do not get to keep the flamingos, I found this to be a creative way to raise money and a cheerful way to start the day.  I've seen various flock sightings in the neighborhood, some very creatively placed flamingos peeking out of bushes, interacting with each other,  and in my case, eating weeds (In my defense, there has been a LOT of rain the past few weeks. Okay, and yes, I tend to be remiss in certain landscaping duties. If only the rabbits that plague our yard would eat weeds instead of any plant that costs over $5!).